MCP-Server
Let your AI assistant work with Sipfront. Connect Claude, ChatGPT, Claude Code, Cursor or any other assistant that supports MCP, and it can look at your projects and tests, run tests, read the results and help you find out why a call failed, all by asking in plain language.
https://mcp.sipfront.net/mcp
Connecting takes a couple of minutes: add the address above to your assistant, sign in with a Sipfront API key when your browser asks, tick what the assistant may do, done.
What you can ask
Once connected, talk to your assistant the way you would talk to a colleague who knows Sipfront:
- "Which of my tests failed today, and what do they have in common?"
- "Compare the SIP trace of the last failed run of test 123 with a run that passed."
- "Create a registration test for my PBX at
pbx.example.comin the Production project and run it." - "Show me the MOS trend of the WebRTC tests over the last two weeks."
- "Add a comment to that run summarising what we found."
Which of these the assistant can do at all is your decision: when you sign in, you choose what the assistant may do, from read-only to full access.
Within what you allowed, the Sipfront MCP server marks each tool as read-only or as one that creates, changes or deletes something. Most assistants ask for your approval before running the latter and let read-only tools run freely, but whether and when an assistant asks is a setting of the assistant, not of Sipfront. Have a look at its tool permissions before you let it change things on its own.
Before you start
- A Sipfront account with REST API access included in the plan.
- A Sipfront API key, see below. The assistant acts on your account with this key, within the permissions you grant when you sign in.
- An AI assistant that supports remote MCP servers. Claude, ChatGPT, Claude Code, Cursor and Visual Studio Code all do; pick yours below.
Get your API key
- In the Sipfront web app, open Account › API Keys.
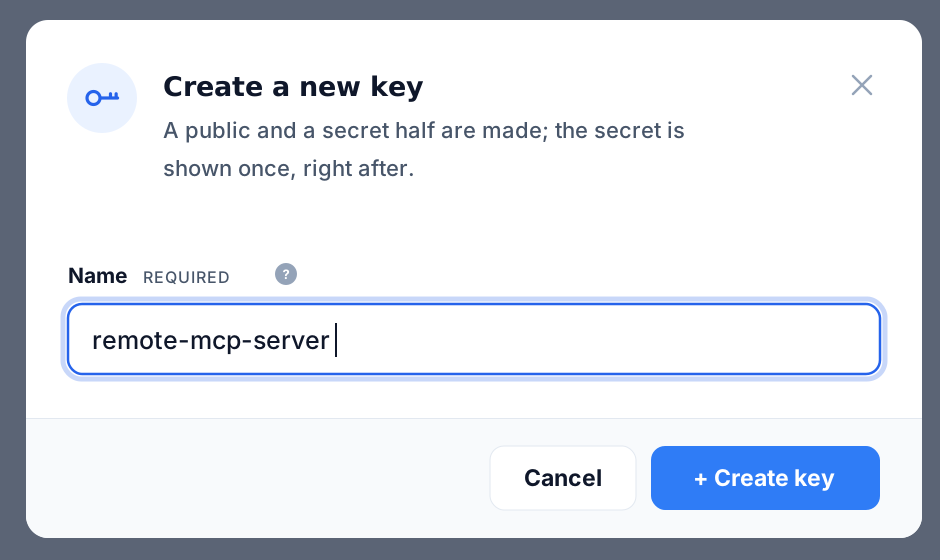
- Press + Create new key in the top right corner.
- Enter a name that tells you later what the key is for, such as
claudeorremote-mcp-server, and press Create key.
- Copy the public and the secret part and store both in your password manager, for example as a login entry named
Sipfront API keywith the public key as user name and the secret as password.

The secret is shown only once
Sipfront never shows the secret again. You need both parts whenever you connect another assistant or sign in again, so save them in your password manager right away, not in a chat or a plain text file. If you lose the secret, press Replace on the key to get a new one.
Connect your assistant
- Claude
Claude Desktop and claude.ai, as a custom connector - Claude Code
Anthropic's coding agent in the terminal - ChatGPT
As a connector in ChatGPT - Cursor
The AI code editor - Visual Studio Code
Copilot's agent mode - Other assistants
Anything else that speaks MCP
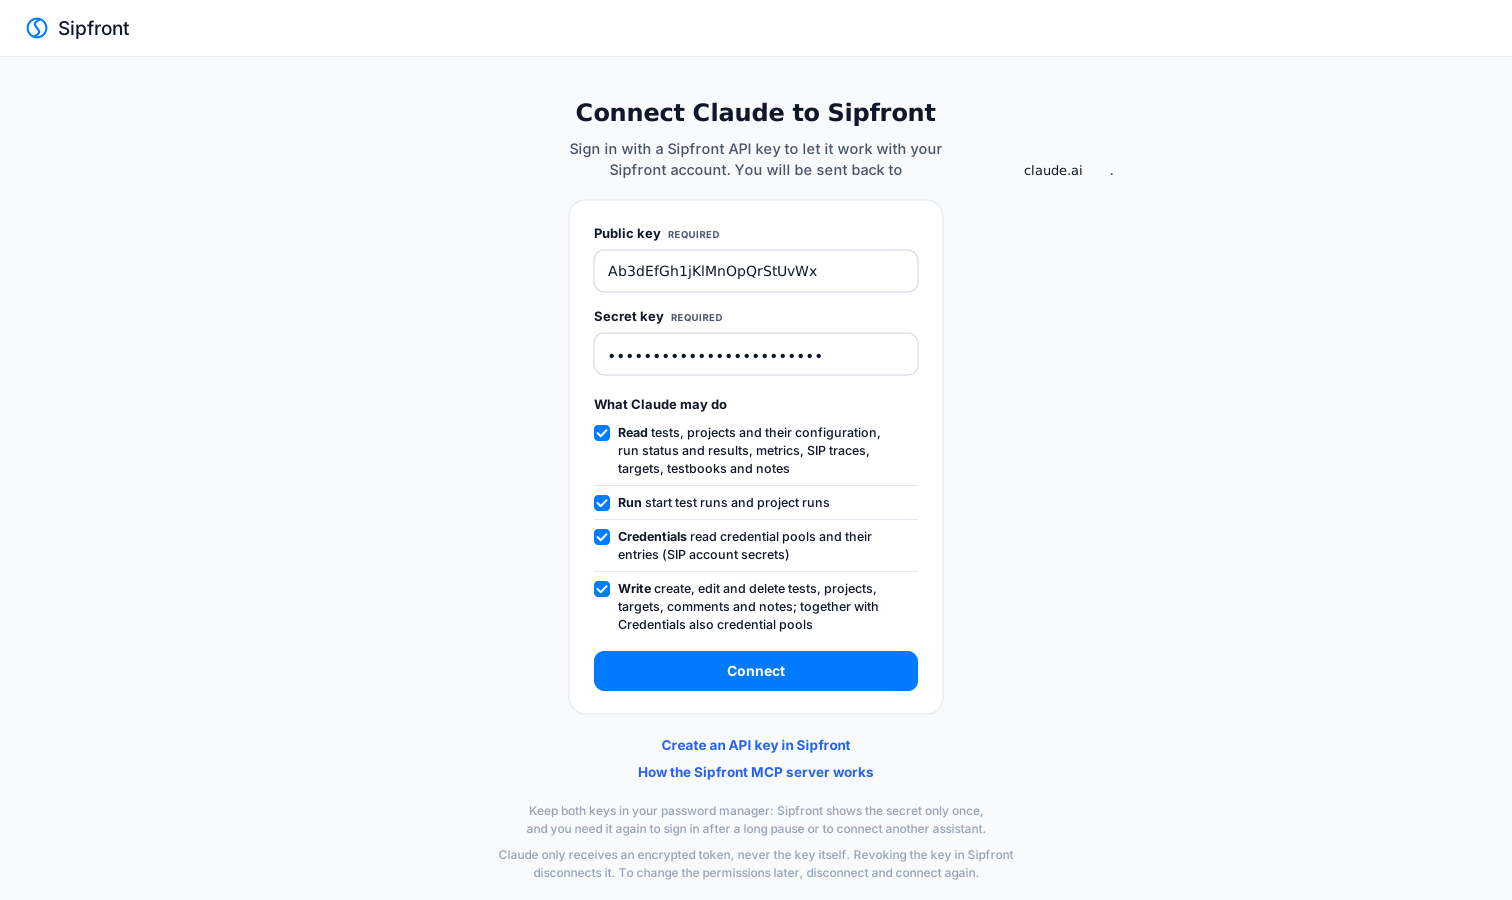
Whichever you choose, the sign-in is the same: a Sipfront page opens in your browser, you paste your public and secret key, tick what the assistant may do, press Connect, and you are sent back to your assistant.
Choose what the assistant may do
Your API key can do everything in your account, but the assistant does not have to. The sign-in page lists four permissions; untick what this assistant should not be able to do.
| Permission | What it allows |
|---|---|
| Read | Look at tests, projects and their configuration, run status and results, metrics, SIP traces, targets, testbooks and notes |
| Run | Start test runs and project runs |
| Credentials | Read credential pools and their entries, that is the SIP accounts and passwords your tests sign in with |
| Write | Create, edit and delete tests, projects, targets, run comments and notes. Together with Credentials, also create and delete credential pools |
All four are ticked when the page opens, so an assistant gets full access unless you say otherwise. At least one must stay ticked. A good start for a chat assistant is Read and Run: it can investigate failures and re-run tests, but cannot change or delete anything and never sees your SIP passwords.
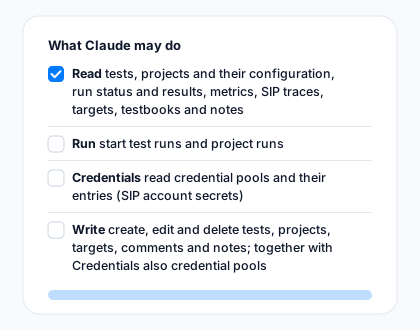
What you tick is the ceiling for that connection:
- The assistant only gets the tools it may use. With Read alone, its tool list holds the 23 read-only tools and nothing else, so it cannot even try to run or change something.
- If it attempts a tool it does not have anyway, the Sipfront MCP server refuses and tells it which permission is missing, so it can ask you instead of guessing.
- The choice is locked into the connection. To change it, disconnect the assistant and connect it again, ticking differently.
- Connections that use the key directly, that is the header setup and the local Docker image described below, always have full access: whoever holds the key can do everything with it anyway.
Claude
Works the same in the Claude Desktop app and on claude.ai. Custom connectors are available on Claude's paid plans.
- Open Settings › Connectors.
- Press Add › Add custom connector.
-
Enter
Sipfrontas the name and this as the URL, then press Continue:https://mcp.sipfront.net/mcp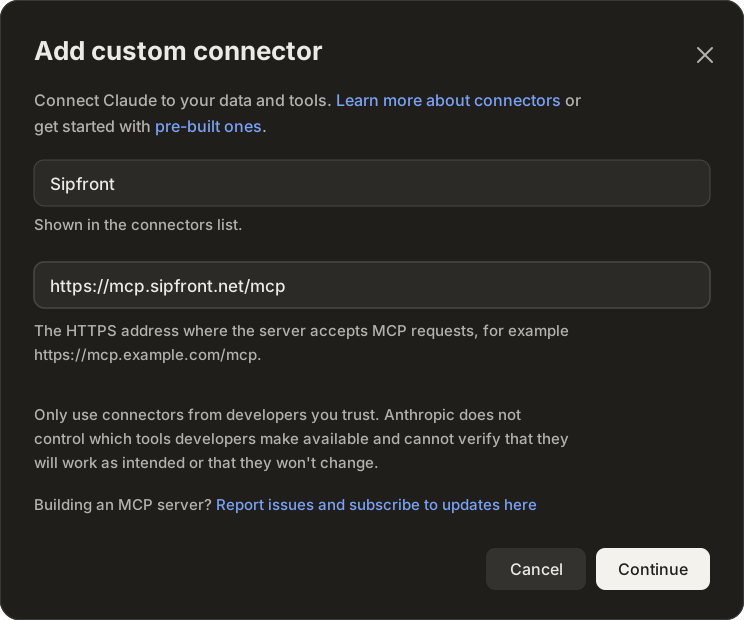
Name and address of the connector -
Claude detects how the server authenticates. Leave Sign in now and Register automatically selected and press Add.
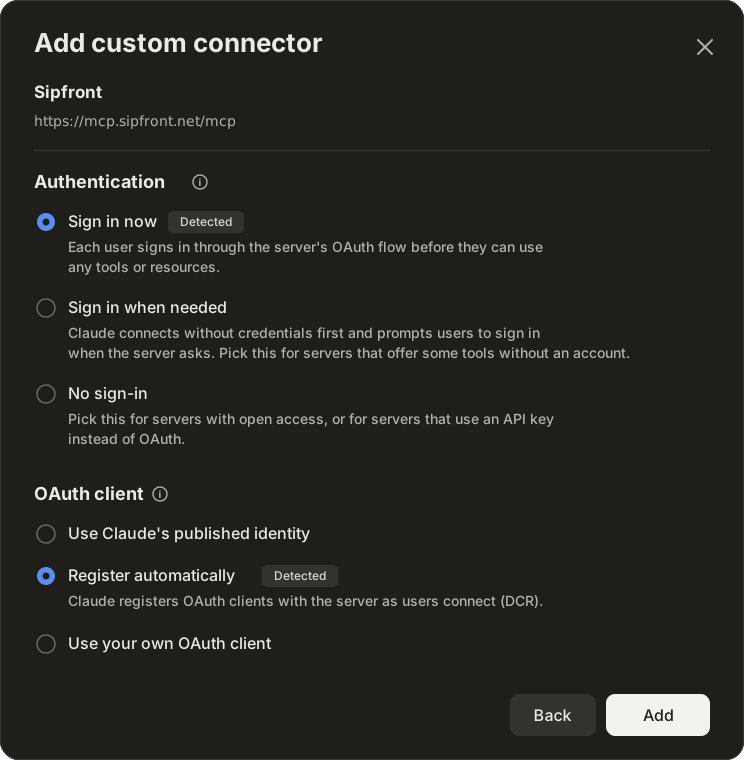
Both detected settings are right for Sipfront -
Press Connect. Your browser opens; if claude.ai first asks Finish connecting a connector?, press Continue connecting. On the Sipfront sign-in page, paste your keys, tick what Claude may do and press Connect.
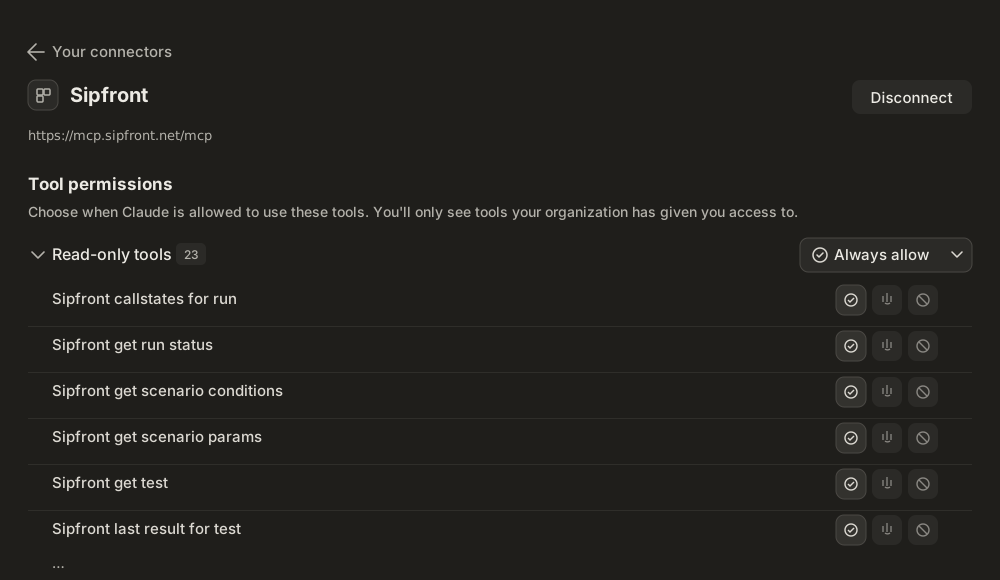
You're ready to use the Sipfront connector. Under Settings › Connectors › Sipfront you can see which tools it got and set, per tool, whether Claude has to ask you before using it.
Claude Code
The quickest way is the Sipfront plugin, which connects the MCP server and adds two commands, /sipfront:run-test and /sipfront:analyze-failures.
-
In Claude Code, add the Sipfront marketplace and install the plugin:
/plugin marketplace add sipfront/mcp-plugin /plugin install sipfront@sipfront -
Run
/reload-pluginsso the server starts without restarting Claude Code. - Run
/mcp, select sipfront and choose Authenticate. Your browser opens the Sipfront sign-in page; paste your keys, tick what Claude Code may do and press Connect. For a coding agent that should create and run tests, tick Read, Run and Write.
You're ready. Try /sipfront:analyze-failures for a first look at your failed tests, /sipfront:run-test <test> to run one, or just ask, for example "create a registration test for the PBX configured in this repo". Claude Code stores the tokens and refreshes them automatically. The plugin's source is at github.com/sipfront/mcp-plugin.
Without the plugin
You can also add the server directly. It gives you the same Sipfront tools, without the two commands:
claude mcp add --transport http --scope user sipfront https://mcp.sipfront.net/mcp
Then authenticate as in step 3 above.
Where the connector is available depends on the --scope you pick:
| Scope | Command | Available in |
|---|---|---|
user | claude mcp add --transport http --scope user sipfront https://mcp.sipfront.net/mcp | Every project on your machine, for you. The usual choice. |
local (default) | claude mcp add --transport http sipfront https://mcp.sipfront.net/mcp | Only the project directory you run the command in, for you. |
project | claude mcp add --transport http --scope project sipfront https://mcp.sipfront.net/mcp | Everyone who checks out the repository: the server is written to .mcp.json in the project. Each person signs in with their own API key. |
The .mcp.json entry that --scope project creates looks like this, in case you prefer to add it by hand:
{
  "mcpServers": {
    "sipfront": {
      "type": "http",
      "url": "https://mcp.sipfront.net/mcp"
    }
  }
}
No browser at hand, for example in CI?
Pass the key as a header instead of signing in. Keep the secret out of the command line and out of files that are checked in: put it in an environment variable, for example from your CI's secret store, and reference the variable in .mcp.json, which Claude Code expands when it starts the server:
{
  "mcpServers": {
    "sipfront": {
      "type": "http",
      "url": "https://mcp.sipfront.net/mcp",
      "headers": {
        "Authorization": "Bearer ${SIPFRONT_MCP_KEY}"
      }
    }
  }
}
with SIPFRONT_MCP_KEY set to YOUR-PUBLIC-KEY:YOUR-SECRET-KEY in the environment. Typing the key literally into claude mcp add --header ... works too, but leaves it in your shell history and visible in the process list, so use a dedicated key you can revoke on its own if you do. A connection made this way has full access; the permission choice only exists on the sign-in page.
ChatGPT
- Open Settings › Connectors. On some plans you first have to switch on Developer mode under Advanced, or ask your workspace admin to add the connector for everyone.
- Press Create.
- Enter
Sipfrontas the name andhttps://mcp.sipfront.net/mcpas the URL, choose OAuth as the authentication and press Create. - Your browser opens the Sipfront sign-in page; paste your keys and press Connect.
You're ready. Enable the Sipfront connector in a chat and ask your question.
Cursor
-
Open Settings › Tools & MCP and press Add custom MCP, or edit
~/.cursor/mcp.jsondirectly:{ "mcpServers": { "sipfront": { "url": "https://mcp.sipfront.net/mcp" } } } -
Cursor shows the server as needing login; press it. Your browser opens the Sipfront sign-in page; paste your keys and press Connect.
You're ready.
Visual Studio Code
-
Run MCP: Add Server from the command palette, choose HTTP and enter
https://mcp.sipfront.net/mcp, or add it to.vscode/mcp.json:{ "servers": { "sipfront": { "type": "http", "url": "https://mcp.sipfront.net/mcp" } } } -
Start the server from the editor. Your browser opens the Sipfront sign-in page; paste your keys and press Connect.
You're ready to use Sipfront in Copilot's agent mode.
Other assistants
Any assistant that supports remote MCP servers works the same way.
- Add
https://mcp.sipfront.net/mcpwhere the assistant asks for the MCP server URL. - Your browser opens the Sipfront sign-in page; paste your keys and press Connect.
You're ready.
Some tools cannot open the sign-in page but let you set a header for the connection. Give them the key directly, either as Authorization: Bearer YOUR-PUBLIC-KEY:YOUR-SECRET-KEY or as ordinary Basic authentication with the public key as user name and the secret as password:
{
  "mcpServers": {
    "sipfront": {
      "url": "https://mcp.sipfront.net/mcp",
      "headers": {
        "Authorization": "Bearer YOUR-PUBLIC-KEY:YOUR-SECRET-KEY"
      }
    }
  }
}
Warning
This stores your secret in plain text in that tool's configuration, so use a dedicated key you can revoke on its own. Such a connection also has full access to your account; the permission choice only exists on the sign-in page.
Staying in control
- Grant only what is needed. When you sign in, untick what the assistant should not do: an assistant that only analyses results needs Read, one that re-runs tests Read and Run. Few assistants need Credentials or Write. See Choose what the assistant may do.
- One key, one assistant. Create a separate key for each assistant. Then the key's name tells you who is using your account, and you can disconnect one without touching the others.
- Disconnect any time. Press Revoke on the key under Account › API Keys and the assistant loses access: immediately for anything that touches your data, and within a minute for the last cached checks. Removing the connector in the assistant works too.
- Your secret stays with you. When you connect through the browser sign-in, the assistant never sees your key; it only receives an encrypted token from the Sipfront MCP server, and tokens renew themselves while the assistant is in use. The exceptions are the header setup and the local Docker image, where the key is written into the assistant's configuration: use a dedicated key there that you can revoke on its own.
- Your plan applies. Everything the assistant does runs with your API key, within the permissions you ticked, so the limits and permissions of your Sipfront plan apply as if you had made the request yourself.
Questions and troubleshooting
The assistant says the connection failed or asks me to sign in again
Sign in once more with your public and secret key. This happens when the connector has not been used for a long time, or after the key was replaced or revoked. If the sign-in page tells you the key is invalid, check both parts or create a new key.
The sign-in page says my account cannot use the REST API
REST API access is part of specific Sipfront plans. Have a look at your subscription in the web app or contact us.
The assistant says a tool is not permitted for this connection
You signed in without the permission that tool needs, for example Run for starting a test or Write for changing one. Disconnect the Sipfront connector in the assistant and connect it again; on the sign-in page, tick the permission this time. If the assistant does not even offer the tool, that is the same thing: it only gets the tools it may use.
I lost the secret key
The secret cannot be shown again. Press Replace on the key to get a new secret, and sign in again with the assistants that use this key. Store the new secret in your password manager so this does not happen twice.
Where does the data go?
Your assistant talks to the Sipfront MCP server at mcp.sipfront.net, which forwards each request to the Sipfront API with your key. Nothing is stored on the MCP server; it keeps neither your key nor your test data.
Local Docker image
Before the remote server was available, the Sipfront MCP server ran locally as a Docker container started by Claude Desktop, with the API key on the command line. If you set that up, you no longer need Docker Desktop: remove the sipfront entry from claude_desktop_config.json (Claude Desktop: Settings › Developer › Edit Config), restart Claude and add the connector as described under Claude. Your existing API key keeps working.
If you do have to run the server on your own machine, for example because your Sipfront instance is only reachable from your network, the public image sipfront/mcp-server still supports that. It needs Docker Desktop installed and running, the key ends up in the assistant's configuration, so use a dedicated key you can revoke on its own, and the assistant has full access to your account, since there is no sign-in page on which to limit it:
{
  "mcpServers": {
    "sipfront": {
      "command": "docker",
      "args": [
        "run", "--rm", "-i", "sipfront/mcp-server",
        "--api-public-key", "your-public-key",
        "--api-secret-key", "your-secret-key",
        "--api-host", "https://app.sipfront.com"
      ]
    }
  }
}
How authentication works
In plain words: your assistant never gets your Sipfront password, and with the browser sign-in it does not get your API key either. It receives an encrypted token that only the Sipfront MCP server can read, uses that token for every request, renews it on its own while you keep using the assistant, and loses access when you revoke the key in Sipfront (immediately for requests that reach your data, within a minute for the rest). The permissions you ticked are sealed into that token, so the assistant cannot change them.
For developers and troubleshooting, this is the standard MCP authorization flow:
- The Sipfront MCP server speaks the MCP streamable HTTP transport at
/mcp. Responses are plain JSON and the server is stateless, so no session has to be kept. - Authentication is OAuth 2.1 with PKCE and dynamic client registration. Discovery documents are served at
/.well-known/oauth-protected-resource/mcpand/.well-known/oauth-authorization-server. - An unauthenticated request to
/mcpreturns401with aWWW-Authenticateheader pointing at the resource metadata, which is how assistants know to start the sign-in. - The sign-in page verifies your public and secret key against the Sipfront API and issues an access token (valid for one hour) and a refresh token (valid for 30 days, renewed on use). Every request the assistant makes runs against the Sipfront API with your key, so your plan's permissions and limits apply.
- The permissions are OAuth scopes:
sipfront:read,sipfront:run,sipfront:credentialsandsipfront:write, listed asscopes_supportedin both discovery documents. A client may request a subset up front; the user confirms or narrows the choice on the sign-in page, and the token response'sscopestates what was granted. The MCP server lists only the tools the token allows intools/listand answers a call outside the grant with anisErrorresult naming the missing scope. A refresh can narrow the scope, never widen it. Credentials sent directly as a header (Basic or a raw key pair as bearer token) are not scoped.