In our previous blog posts of this series on how to deploy Homer on AWS, we discussed
Scope of this blog post
In this article, we will focus on how to ingest the captured traffic into your Homer database at scale by leveraging ECS auto-scaling. We will not go into details about chosing the right database and tuning it to handle the traffic. This is an art in itself which we’ll cover at a later point. For now, we will use a stock PostgreSQL database (in our case the managed AWS RDS PostgreSQL) to store our traffic.
Requirements
Our requirements at Sipfront to ingest the traffic are pretty straight-forward.
- Ingest HEP traffic generated by kamailio’s siptrace module.
- We use lots of test agents delivering traffic, so be able to scale the ingestion.
Ingestion flow
AWS ECS has an auto-scaling feature to grow and shrink an ECS service based on CPU and memory utilization. This is achieved by defining ECS Tasks (we use the Fargate launch type, which provides a fully managed environment to launch docker containers) in the ECS service and run them behind an EC2 load balancer. The tasks automatically register at the load-balancer and get started and stopped according to the work-load.
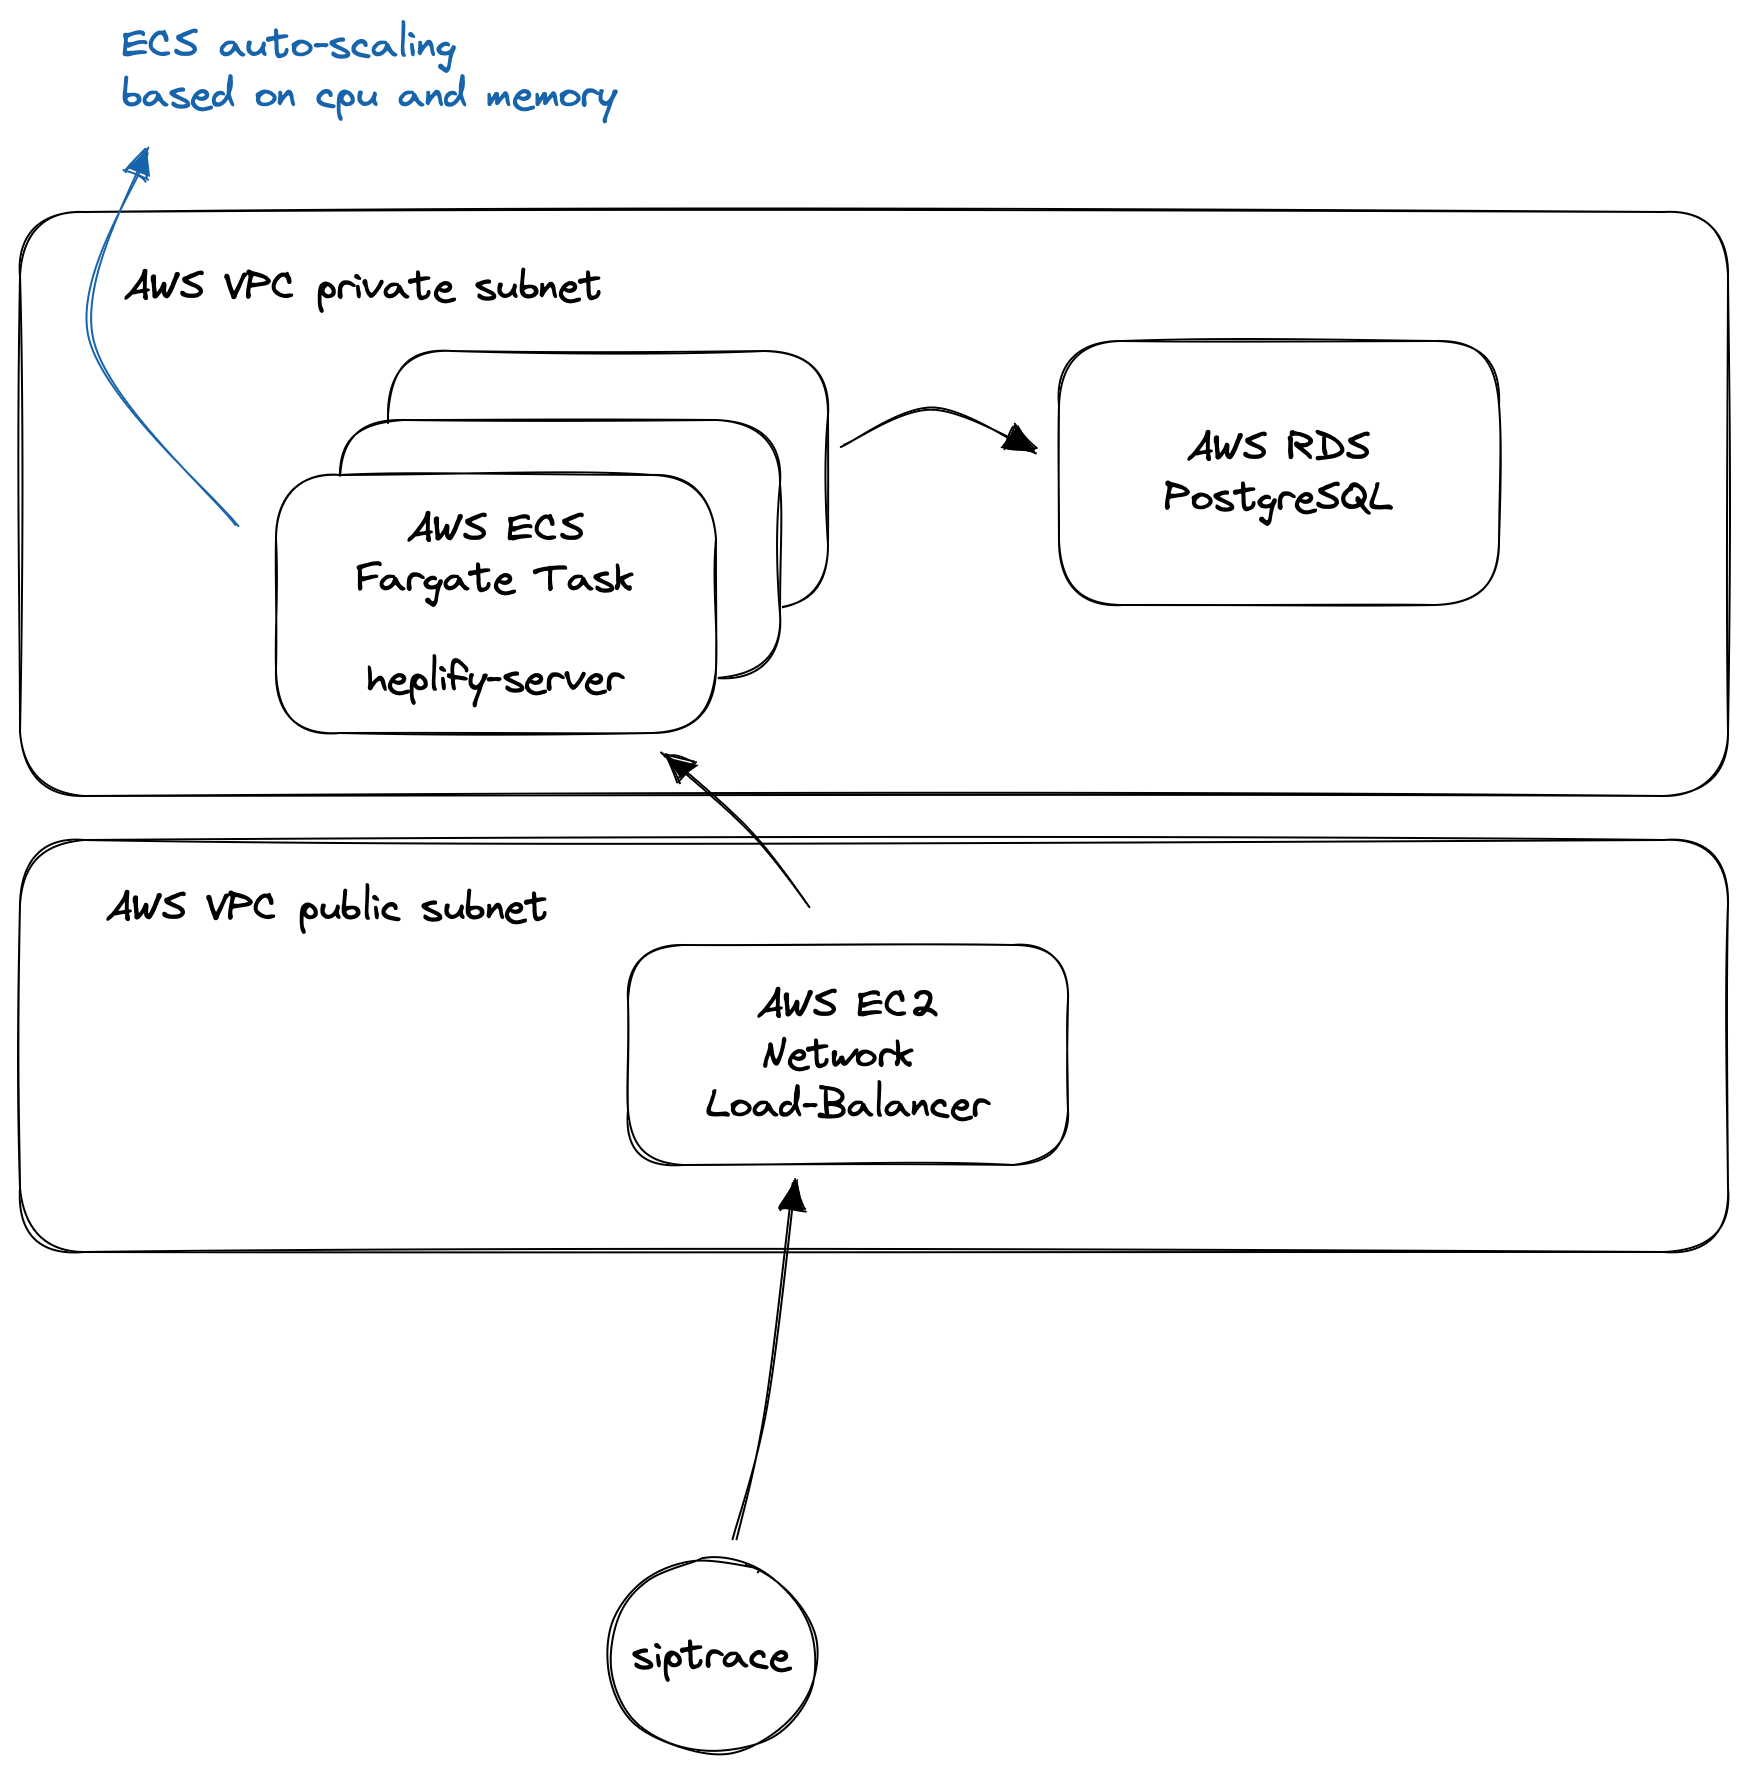
The kamailio siptrace module sends the HEP data to our ECS network load balancer, which distributes it across the sipfront-heplify tasks, which in turn write the data into our AWS RDS database.
Configuring the heplify docker image
Heplify provides an official docker image, which we are going to utilize. However, we need some custom configuration for heplify depending on the environment we run it (of course we have development/staging infrastructure besides our production service), so we have to add a bit of run-time logic when starting the service.
On the different deployments, Sipfront utilizes the AWS Secrets Manager to store credentials, and we’ll utilize this to configure our heplify servers. Therefore, we create our own docker image based on the official upstream image and add a custom config and a custom start script.
# Dockerfile

FROM sipcapture/heplify-server

RUN apk add --update --no-cache python3 && \
    python3 -m ensurepip && \
    pip3 install boto3 requests toml
COPY ./heplify-server.toml /etc/heplify-server.toml
COPY ./sipfront-run.py /usr/bin/sipfront-run
CMD ["/usr/bin/sipfront-run"]
So we base our image on the official upstream image and provide our own config file and start script.
# heplify-server.toml

HEPAddr               = "0.0.0.0:9060"
HEPTCPAddr            = "0.0.0.0:9061"
HEPTLSAddr            = "0.0.0.0:9062"
HEPWSAddr             = "0.0.0.0:3000"
ESAddr                = ""
ESDiscovery           = false
LokiURL               = ""
LokiBulk              = 200
LokiTimer             = 2
LokiBuffer            = 100000
LokiHEPFilter         = [1,5,100]
ForceHEPPayload       = []
PromAddr              = ""
PromTargetIP          = ""
PromTargetName        = ""
DBShema               = "homer7"
DBDriver              = "postgres"
DBAddr                = "localhost:5432"
DBUser                = "postgres"
DBPass                = ""
DBDataTable           = "homer_data"
DBConfTable           = "homer_config"
DBBulk                = 200
DBTimer               = 4
DBBuffer              = 400000
DBWorker              = 8
DBRotate              = true
DBPartLog             = "2h"
DBPartSip             = "1h"
DBPartQos             = "6h"
DBDropDays            = 7
DBDropDaysCall        = 0
DBDropDaysRegister    = 0
DBDropDaysDefault     = 0
DBDropOnStart         = false
DBUsageProtection     = true
DBUsageScheme         = "percentage"
DBPercentageUsage     = "80%"
DBMaxSize             = "30MB"
Dedup                 = false
DiscardMethod         = []
AlegIDs               = []
CustomHeader          = []
SIPHeader             = []
LogDbg                = ""
LogLvl                = "info"
LogStd                = true
LogSys                = false
Config                = "/heplify-server.toml"
ConfigHTTPAddr        = "0.0.0.0:80"
#!/usr/bin/env python3

import boto3
import json
import os
import requests
import toml
from botocore.exceptions import ClientError

DB_REGION = "eu-central-1"

aws_session = boto3.session.Session()
secrets_client = aws_session.client(
    service_name = 'secretsmanager',
    region_name = DB_REGION,
)

def get_secret(secret_name):

    try:
        get_secret_value_response = secrets_client.get_secret_value(
            SecretId=secret_name
        )
        secret_data = get_secret_value_response['SecretString']
        return json.loads(secret_data)
    except ClientError as e:
        if e.response['Error']['Code'] == 'ResourceNotFoundException':
            print("The requested secret " + secret_name + " was not found")
        elif e.response['Error']['Code'] == 'InvalidRequestException':
            print("The request was invalid due to:", e)
        elif e.response['Error']['Code'] == 'InvalidParameterException':
            print("The request had invalid params:", e)
        raise e
    except json.JSONDecodeError as e:
        print("The request was an invalid json due to:", e)
        raise e

def handle(event, context):
    db_secrets = get_secret("psql-homer-credentials");

    cfg = "/etc/heplify-server.toml"
    config = toml.load(cfg, _dict=dict)
    config['DBAddr'] = db_secrets['host'] + ":" + db_secrets['port']
    config['DBUser'] = db_secrets['username']
    config['DBPass'] = db_secrets['password']
    with open(cfg, "w") as f:
        toml.dump(config, f)

    os.system("/root/heplify-server -config /etc/heplify-server.toml")

if __name__ == "__main__":
    handle('', '')
What’s happening here is essentially fetching the DB credentials (host, port, user, password) from the AWS secrets manager on start-up of the container, and write it to our custom config file, then launch the heplify-server binary.
Deploying the infrastructure
At Sipfront, we utilize Terraform to manage our AWS infrastructure. This allows us to define our services once, and get it deployed on our different environments. Being able to manage the infrastructe as code in git is of course another huge plus.
First, we need to define a task definition for our heplify instance.
resource "aws_ecs_task_definition" "sipfront_taskdef_heplify" {
    network_mode = "awsvpc"
    requires_compatibilities = ["FARGATE"]
    cpu = 512
    memory = 1024
    execution_role_arn = data.terraform_remote_state.clusters.outputs.sipfront_role_task_execution_arn
    task_role_arn = data.terraform_remote_state.clusters.outputs.sipfront_role_service_container_arn
    family = "sipfront-heplify"
    container_definitions = jsonencode([{
        name = "sipfront-heplify"
        image = "${var.aws_account_id}.dkr.ecr.${var.aws_region}.amazonaws.com/sipfront-heplify:latest"
        essential = true
        portMappings = [
          {
            protocol = "udp"
            containerPort = 9060
            hostPort = 9060
          },
          {
            protocol = "tcp"
            containerPort = 9061
            hostPort = 9061
          },
          {
            protocol = "tcp"
            containerPort = 80
            hostPort = 80
          }
        ]
        logConfiguration = {
          # our aws firelense config goes here to log to elasticsearch
        }
    }
    # our datadog and firelense container definitions go here too...
  ])
}
We need to define the load-balancer as well:
resource "aws_lb" "sipfront_lb_heplify" {
    name = "sipfront-heplify"
    internal = false
    load_balancer_type = "network"
    subnets = [
      # the list of our public subnets to place the load-balancer into
    ]
    ip_address_type = "ipv4"
    enable_deletion_protection = false
}
Our load-balancer needs two target groups. The first one is to balance udp traffic towards our heplify tasks, and the second one is for tcp. We also define a health check for the load-balancer to detect if a heplify task got stuck, just in case.
These target groups allow our heplify tasks to register with the load-balancer and handle its traffic, so it defines the internal side of the load-balancer.
resource "aws_alb_target_group" "sipfront_lbtarget_heplify_udp" {
    name = "sipfront-heplify-udp"
    port = 9060
    protocol = "UDP"
    target_type = "ip"
    vpc_id = data.terraform_remote_state.networks.outputs.sipfront_vpc_backend_id

    health_check {
        healthy_threshold = "3"
        interval = "30"
        port = "80"
        protocol = "HTTP"
        matcher = "200"
        timeout = "3"
        path = "/"
        unhealthy_threshold = "2"
    }

    depends_on = [ aws_lb.sipfront_lb_heplify ]
}

resource "aws_alb_target_group" "sipfront_lbtarget_heplify_tcp" {
    name = "sipfront-heplify-tcp"
    port = 9061
    protocol = "TCP"
    target_type = "ip"
    vpc_id = data.terraform_remote_state.networks.outputs.sipfront_vpc_backend_id

    health_check {
        healthy_threshold = "3"
        interval = "30"
        port = "80"
        protocol = "HTTP"
        matcher = "200"
        timeout = "3"
        path = "/"
        unhealthy_threshold = "2"
    }

    depends_on = [ aws_lb.sipfront_lb_heplify ]
}
On the external side of the load-balancer, we have to configure listeners to allow our siptrace clients to send data.
resource "aws_lb_listener" "sipfront_lblistener_heplify_udp" {
    load_balancer_arn = aws_lb.sipfront_lb_heplify.id
    port = 9060
    protocol = "UDP"

    default_action {
        target_group_arn = aws_alb_target_group.sipfront_lbtarget_heplify_udp.id
        type = "forward"
    }
}

resource "aws_lb_listener" "sipfront_lblistener_heplify_tcp" {
    load_balancer_arn = aws_lb.sipfront_lb_heplify.id
    port = 9061
    protocol = "TCP"

    default_action {
        target_group_arn = aws_alb_target_group.sipfront_lbtarget_heplify_tcp.id
        type = "forward"
    }
}
We expose both UDP and TCP and might consider adding TLS as well.
The last vital part of the infrastructure setup is defining the heplify service as well. The service defines which tasks to run for heplify and which load-balancer to connect the tasks to, basically wrapping our config so far into the actual, well, service.
resource "aws_ecs_service" "sipfront_service_heplify" {
    name = "sipfront-heplify"
    launch_type = "FARGATE"
    cluster = data.terraform_remote_state.clusters.outputs.sipfront_cluster_services_id
    task_definition = aws_ecs_task_definition.sipfront_taskdef_heplify.arn
    desired_count = 1
    enable_execute_command = true
    depends_on = [
      aws_alb_target_group.sipfront_lbtarget_heplify_udp,
      aws_alb_target_group.sipfront_lbtarget_heplify_tcp
    ]

    network_configuration {
        security_groups  = [ aws_security_group.sipfront_security_heplify.id ]
        subnets          = [
          # the private subnets to launch our tasks
        ]
        assign_public_ip = false
    }

    load_balancer {
        target_group_arn = aws_alb_target_group.sipfront_lbtarget_heplify_udp.arn
        container_name   = "sipfront-heplify"
        container_port   = 9060
    }

    load_balancer {
        target_group_arn = aws_alb_target_group.sipfront_lbtarget_heplify_tcp.arn
        container_name   = "sipfront-heplify"
        container_port   = 9061
    }
}
The interesting parts here are desired_count=1 telling ECS to start at least one task. The other part is enable_execute_command=true, which will allow us later to remote access the container using aws ecs execute for troubleshooting purposes.
What’s left is the auto-scaling aspect of the heplify service.
resource "aws_appautoscaling_target" "sipfront_autoscale_heplify" {
    max_capacity       = 10
    min_capacity       = 1
    resource_id        = "service/${data.terraform_remote_state.clusters.outputs.sipfront_cluster_services_name}/${aws_ecs_service.sipfront_service_heplify.name}"
    scalable_dimension = "ecs:service:DesiredCount"
    service_namespace  = "ecs"
}

resource "aws_appautoscaling_policy" "sipfront_autoscalepolicy_heplify_memory" {
    name = "memory-autoscaling"
    policy_type = "TargetTrackingScaling"
    resource_id = aws_appautoscaling_target.sipfront_autoscale_heplify.resource_id
    scalable_dimension = aws_appautoscaling_target.sipfront_autoscale_heplify.scalable_dimension
    service_namespace = aws_appautoscaling_target.sipfront_autoscale_heplify.service_namespace

    target_tracking_scaling_policy_configuration {
        predefined_metric_specification {
            predefined_metric_type = "ECSServiceAverageMemoryUtilization"
        }
        target_value = 80
        scale_in_cooldown = 300
        scale_out_cooldown = 60
    }
}

resource "aws_appautoscaling_policy" "sipfront_autoscalepolicy_heplify_cpu" {
    name = "cpu-autoscaling"
    policy_type = "TargetTrackingScaling"
    resource_id = aws_appautoscaling_target.sipfront_autoscale_heplify.resource_id
    scalable_dimension = aws_appautoscaling_target.sipfront_autoscale_heplify.scalable_dimension
    service_namespace = aws_appautoscaling_target.sipfront_autoscale_heplify.service_namespace

    target_tracking_scaling_policy_configuration {
        predefined_metric_specification {
            predefined_metric_type = "ECSServiceAverageCPUUtilization"
        }
        target_value = 60
        scale_in_cooldown = 300
        scale_out_cooldown = 60
    }
}
Here, we instruct ECS to automatically launch another task if the overall memory consumption of all tasks in the service grows beyond 80% of the available memory, or if the overall CPU usage grows beyond 60% of the available CPU. For instance, if our single heplify task gets lots of traffic and its CPU utilization goes up to 80%, ECS will start another task, causing the load-balancer to distribute the traffic across two tasks, causing the CPU usage to drop to 40% across the whole service.
In order to avoid flapping of tasks, we define a scale-out delay of 60 seconds and a scale-in delay of 300 seconds to smooth out the starting and stopping of tasks.
Conclusion
In this post we showed how to customize heplify-server to be able to use individual configs based on their runtime environment (production, staging, development etc) without having to build docker images for each of them.
We also showed how to apply AWS ECS to auto-scale the number of heplify instances based on the work-load, leveraging AWS network load-balancers and the ECS auto-scaling mechanism.
For those if you who still manually manage their AWS infrastructure, we gave a brief glimpse how you can manage all of this in code by utilizing terraform.
If you have good or bad experience with any of the technology laid out above, or if you can share improvements and real-world experience running all of this, please leave a comment!