In many QA and automation scenarios, you want to place and receive real calls on an actual mobile phone. You might attempt to control the phone via UI automation (e.g., scrcpy or Appium), but quickly discover that audio is inaccessible. That’s because the phone’s native dialer routes the audio directly from and to the modem to its speaker, headphones and mics — bypassing audio interfaces you might be able to tap via ADB.
One simple solution is to present a Raspberry Pi (or any other Linux box) as a Hands-Free Profile (HFP) device to the phone over Bluetooth, just like a car’s hands-free system. This blog post shows how to run the necessary components — bluetoothd, PipeWire, WirePlumber, and oFono — connected via D-Bus on a Raspberry Pi, enabling you to place and receive calls from any paired mobile phone. It also describes how you can inject audio into, and record audio from, the call, which is critical for automated phone testing in real-world networks (4G, 5G, VoLTE, VoNR, Wi-Fi Calling, etc.).
High Level Overview
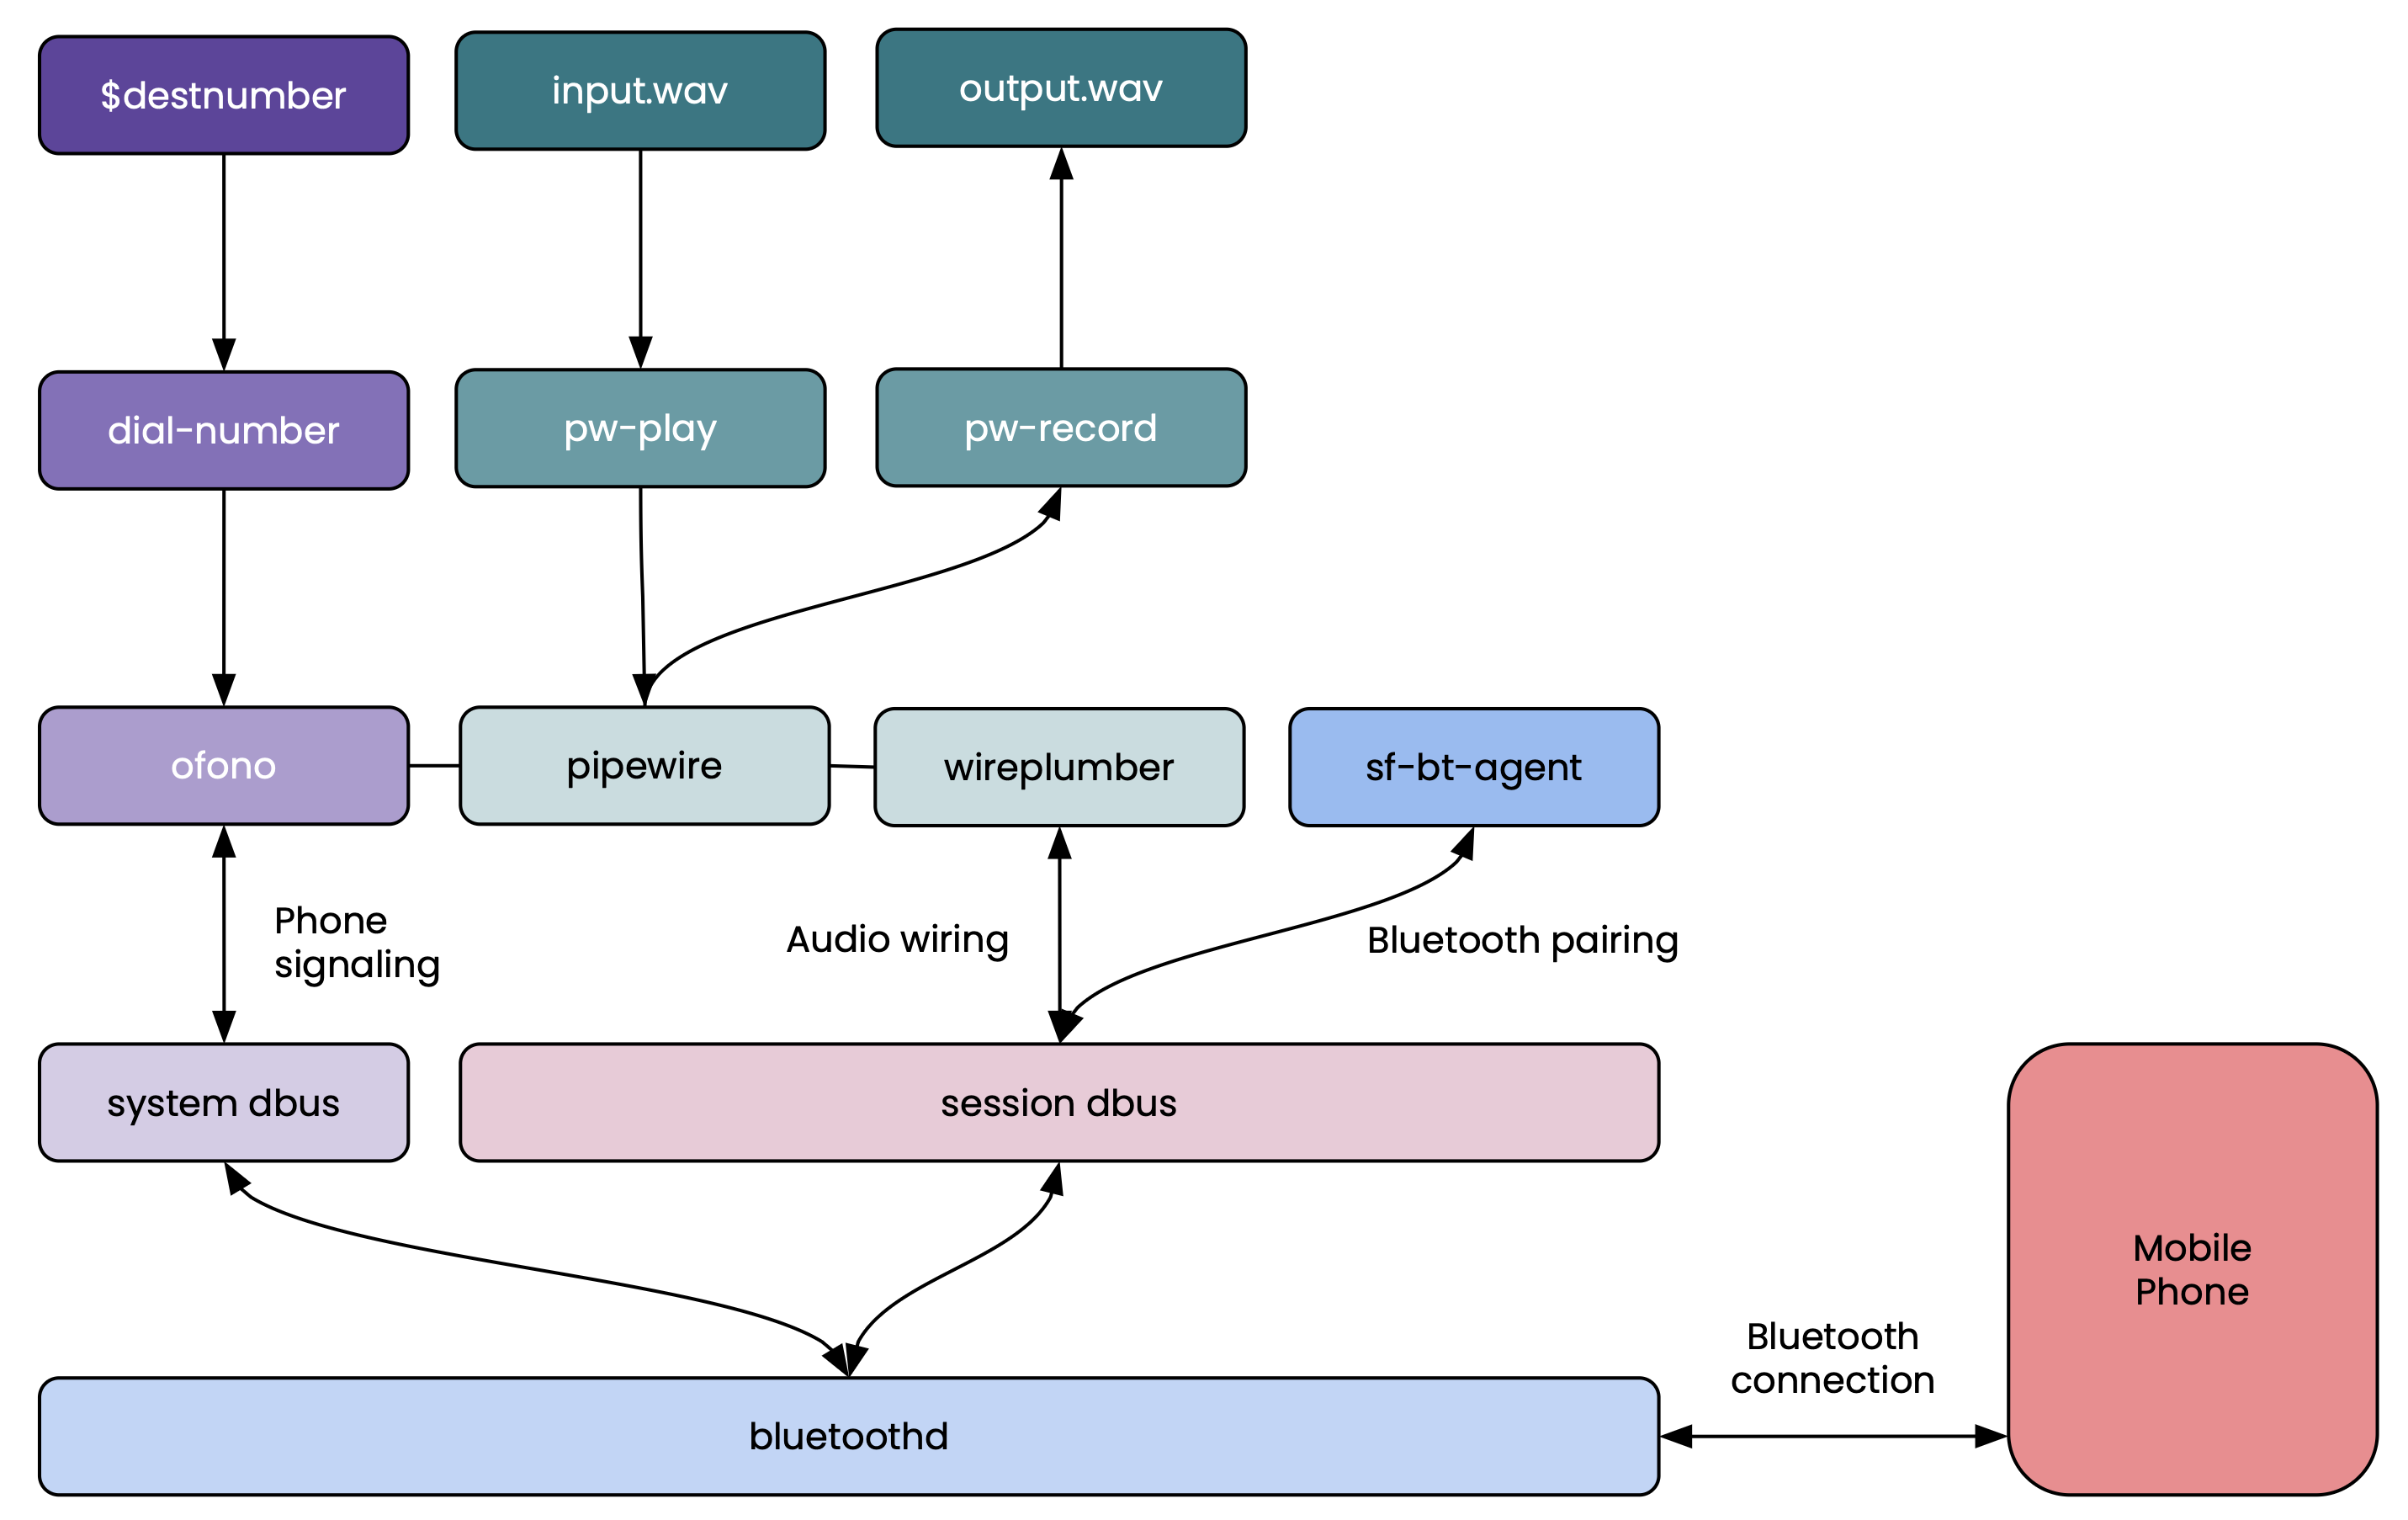
The following diagram shows the components and their interactions:
Components
The following components need to interact with each other to allow controlling the mobile phones both to send phone commands (such as dial, hold, hangup etc.) and receive phone events (incoming call, call closed etc.), as well as inject audio as input and record audio as output.
bluetoothd
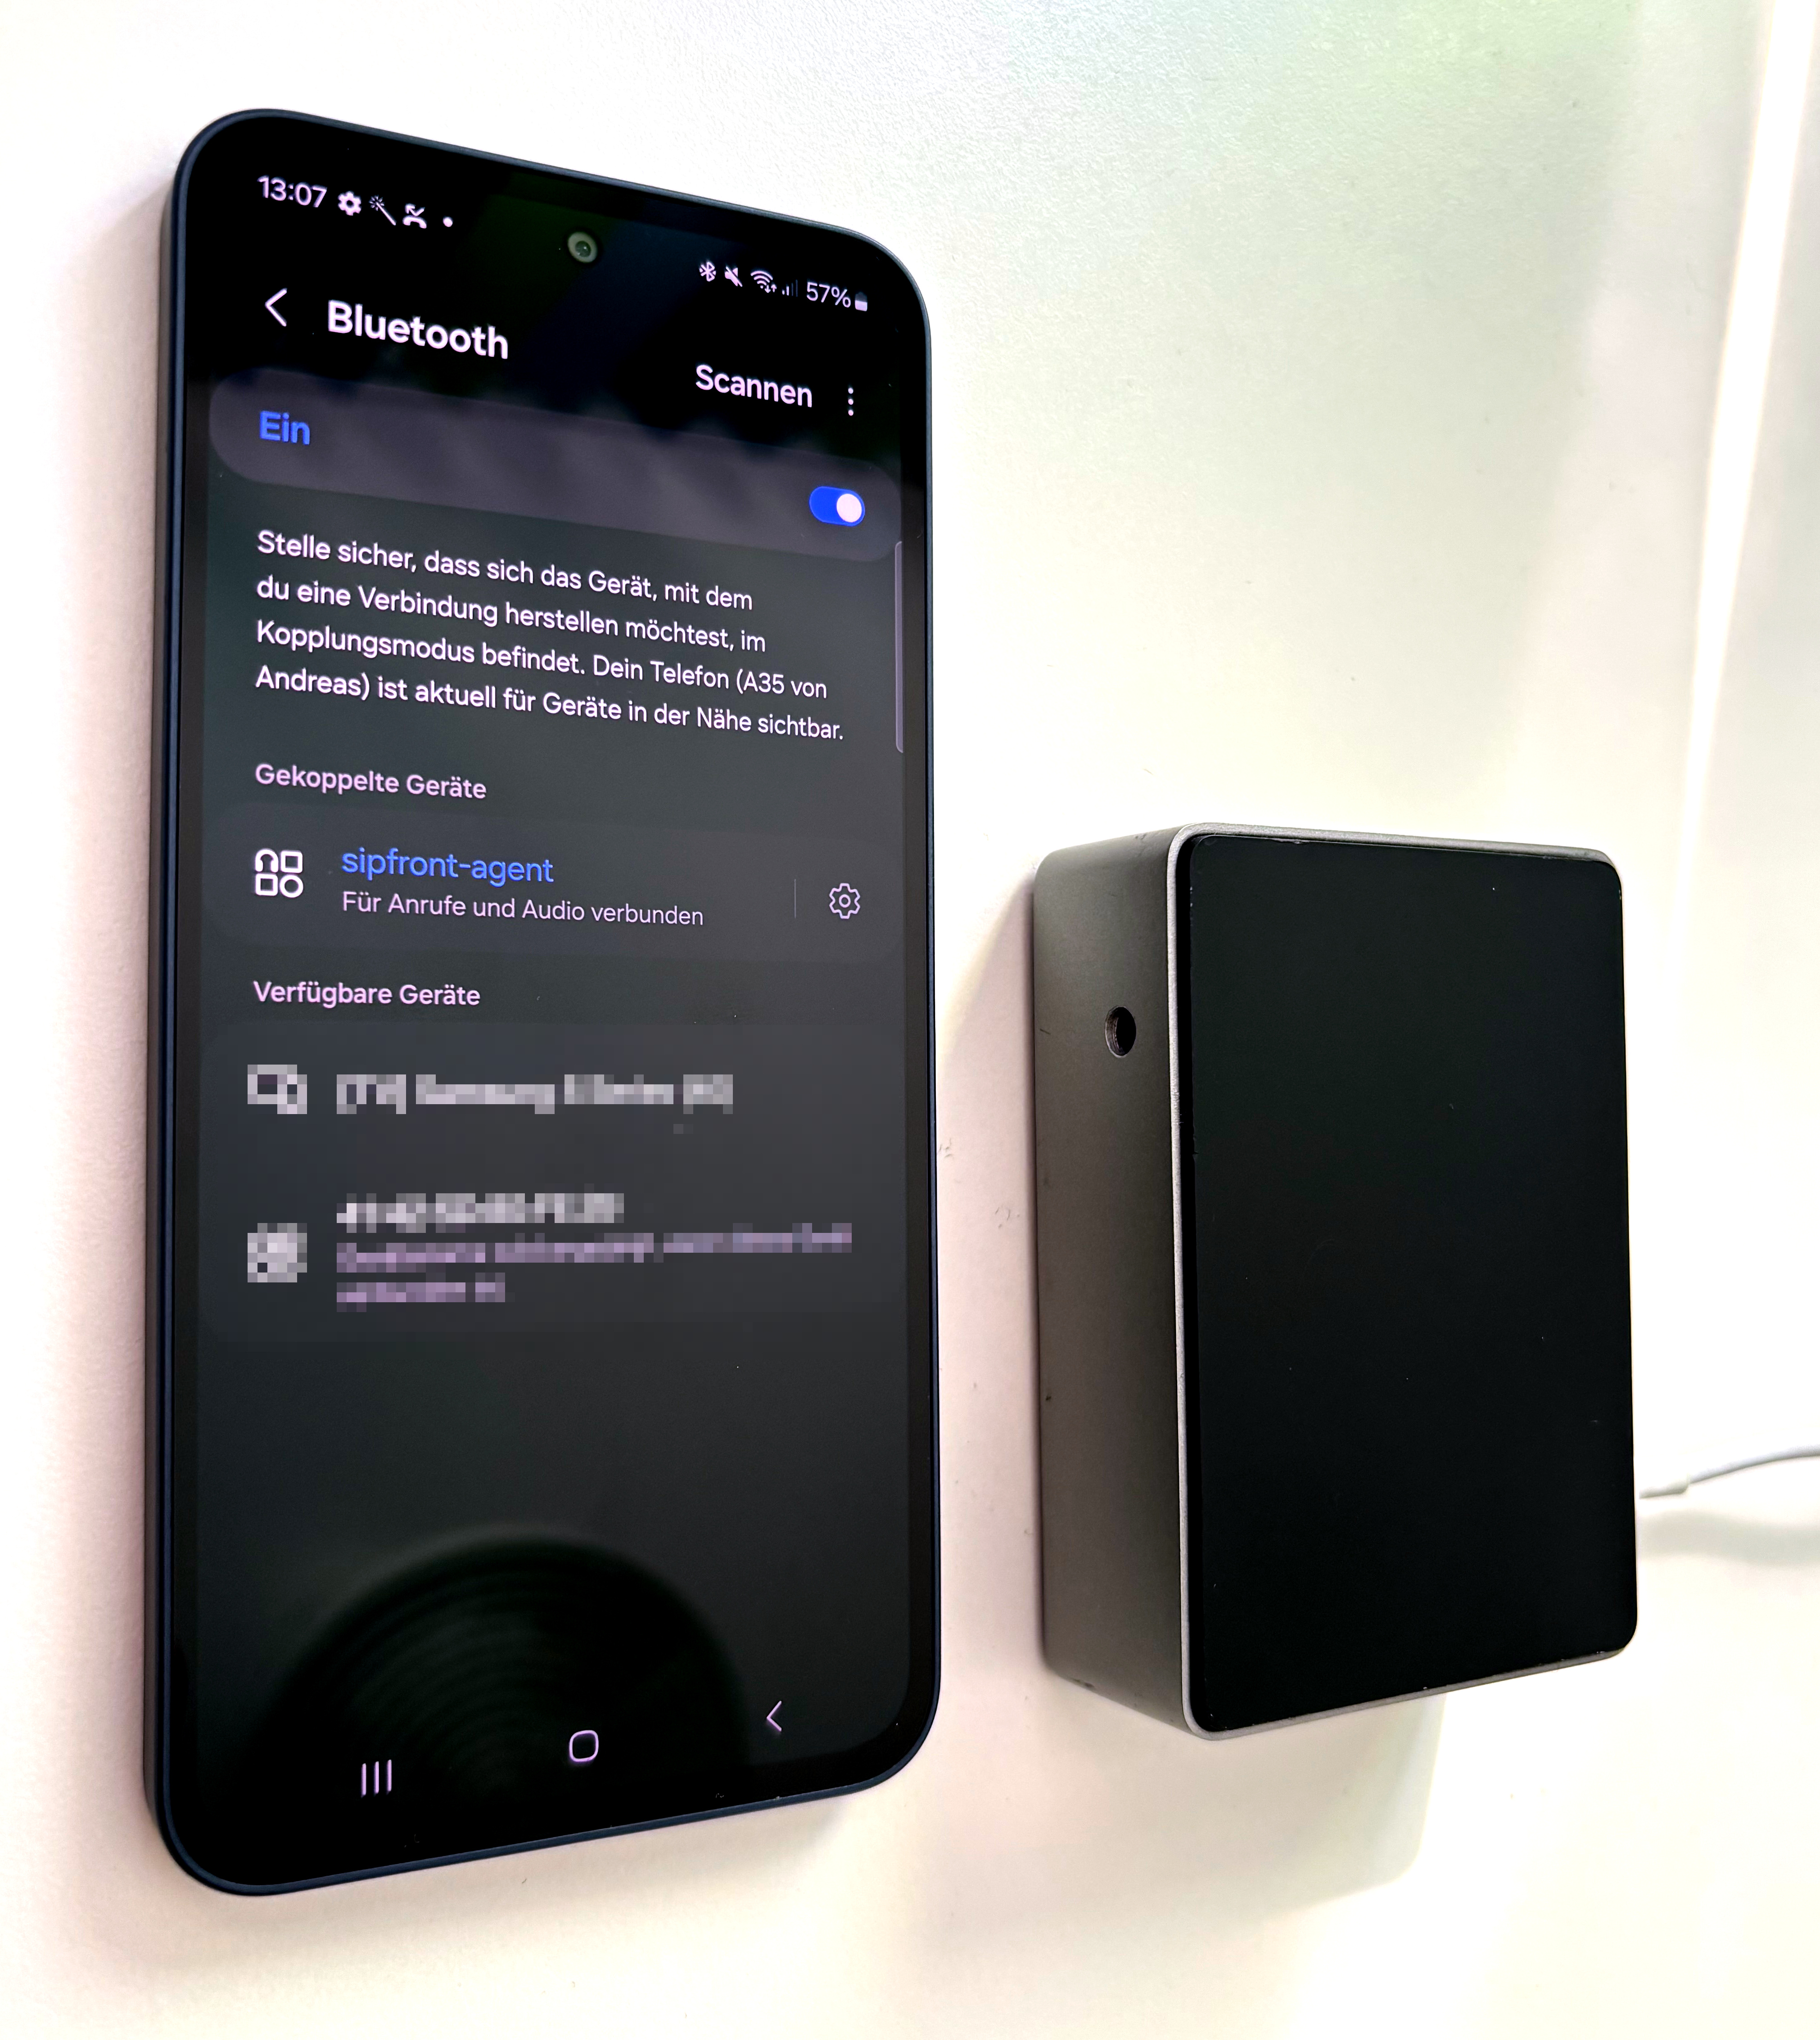
This is the standard Linux Bluetooth daemon. It handles the low-level Bluetooth stack, including pairing and establishing the Hands-Free Profile connection with the phone. Once the phone is paired, the Pi advertises itself as a headset/hands-free device. On android, you usually see the bluetooth icon, while on iOS you often see a car icon as connected audio device.
It does not require any special configuration for this use case, so you can use the default configuration.
sf-bt-agent
This component is a simple python script attached to D-Bus to automatically accept pairing requests from phones. For manual testing, you can very well use bluetoothctl to handle the pairing. The following steps are usually involved:
$ bluetoothctl
[bluetooth]# agent off
[bluetooth]# power on
[bluetooth]# agent NoInputNoOutput
[bluetooth]# discoverable on
[bluetooth]# pairable on
# you should now see the RasPi in the phone's Bluetooth device list;
# pair the phone at this point, then establish a trust relationship
[bluetooth]# trust <xx:xx:xx:xx:xx:xx>
oFono
oFono is a telephony framework that can handle modem and telephony tasks. While in lots of cases used as glue between embedded Linux setups and the modem directly on a phone, it can also handle HFP (Hands-Free Profile) signals on a RasPi when integrated with the the audio stack provided by PipeWire.
A quick check after pairing a device, to verify that oFono is working correctly, is executing /usr/share/ofono/scripts/list-modems, which gives you basic information about the connected phone, such as its carrier and the signal strength.
PipeWire and WirePlumber
PipeWire is a modern audio (and video) server for Linux, replacing components such as PulseAudio and JACK. WirePlumber is the session manager for PipeWire, orchestrating how audio nodes connect to each other. Together, they handle routing of the call audio between the Bluetooth HFP interface and local audio inputs/outputs (e.g. the Raspberry Pi’s sound devices or virtual devices for recording and playback).
D-Bus Integration
All these components communicate over D-Bus (both system and session buses). oFono uses the system D-Bus for telephony events; bluetoothd also runs on the system bus. PipeWire and WirePlumber typically run on the session bus. In order for that to work, it’s important to operate as a user instead of root.
Working with the setup
Dialing a number
Establishing an outbound phone call is a matter of just executing /usr/share/ofono/scripts/dial-number <number>. The call will be placed on the phone and audio is routed to the Raspberry Pi. The call can be terminated by executing /usr/share/ofono/scripts/hangup-active-calls.
Injecting and recording audio
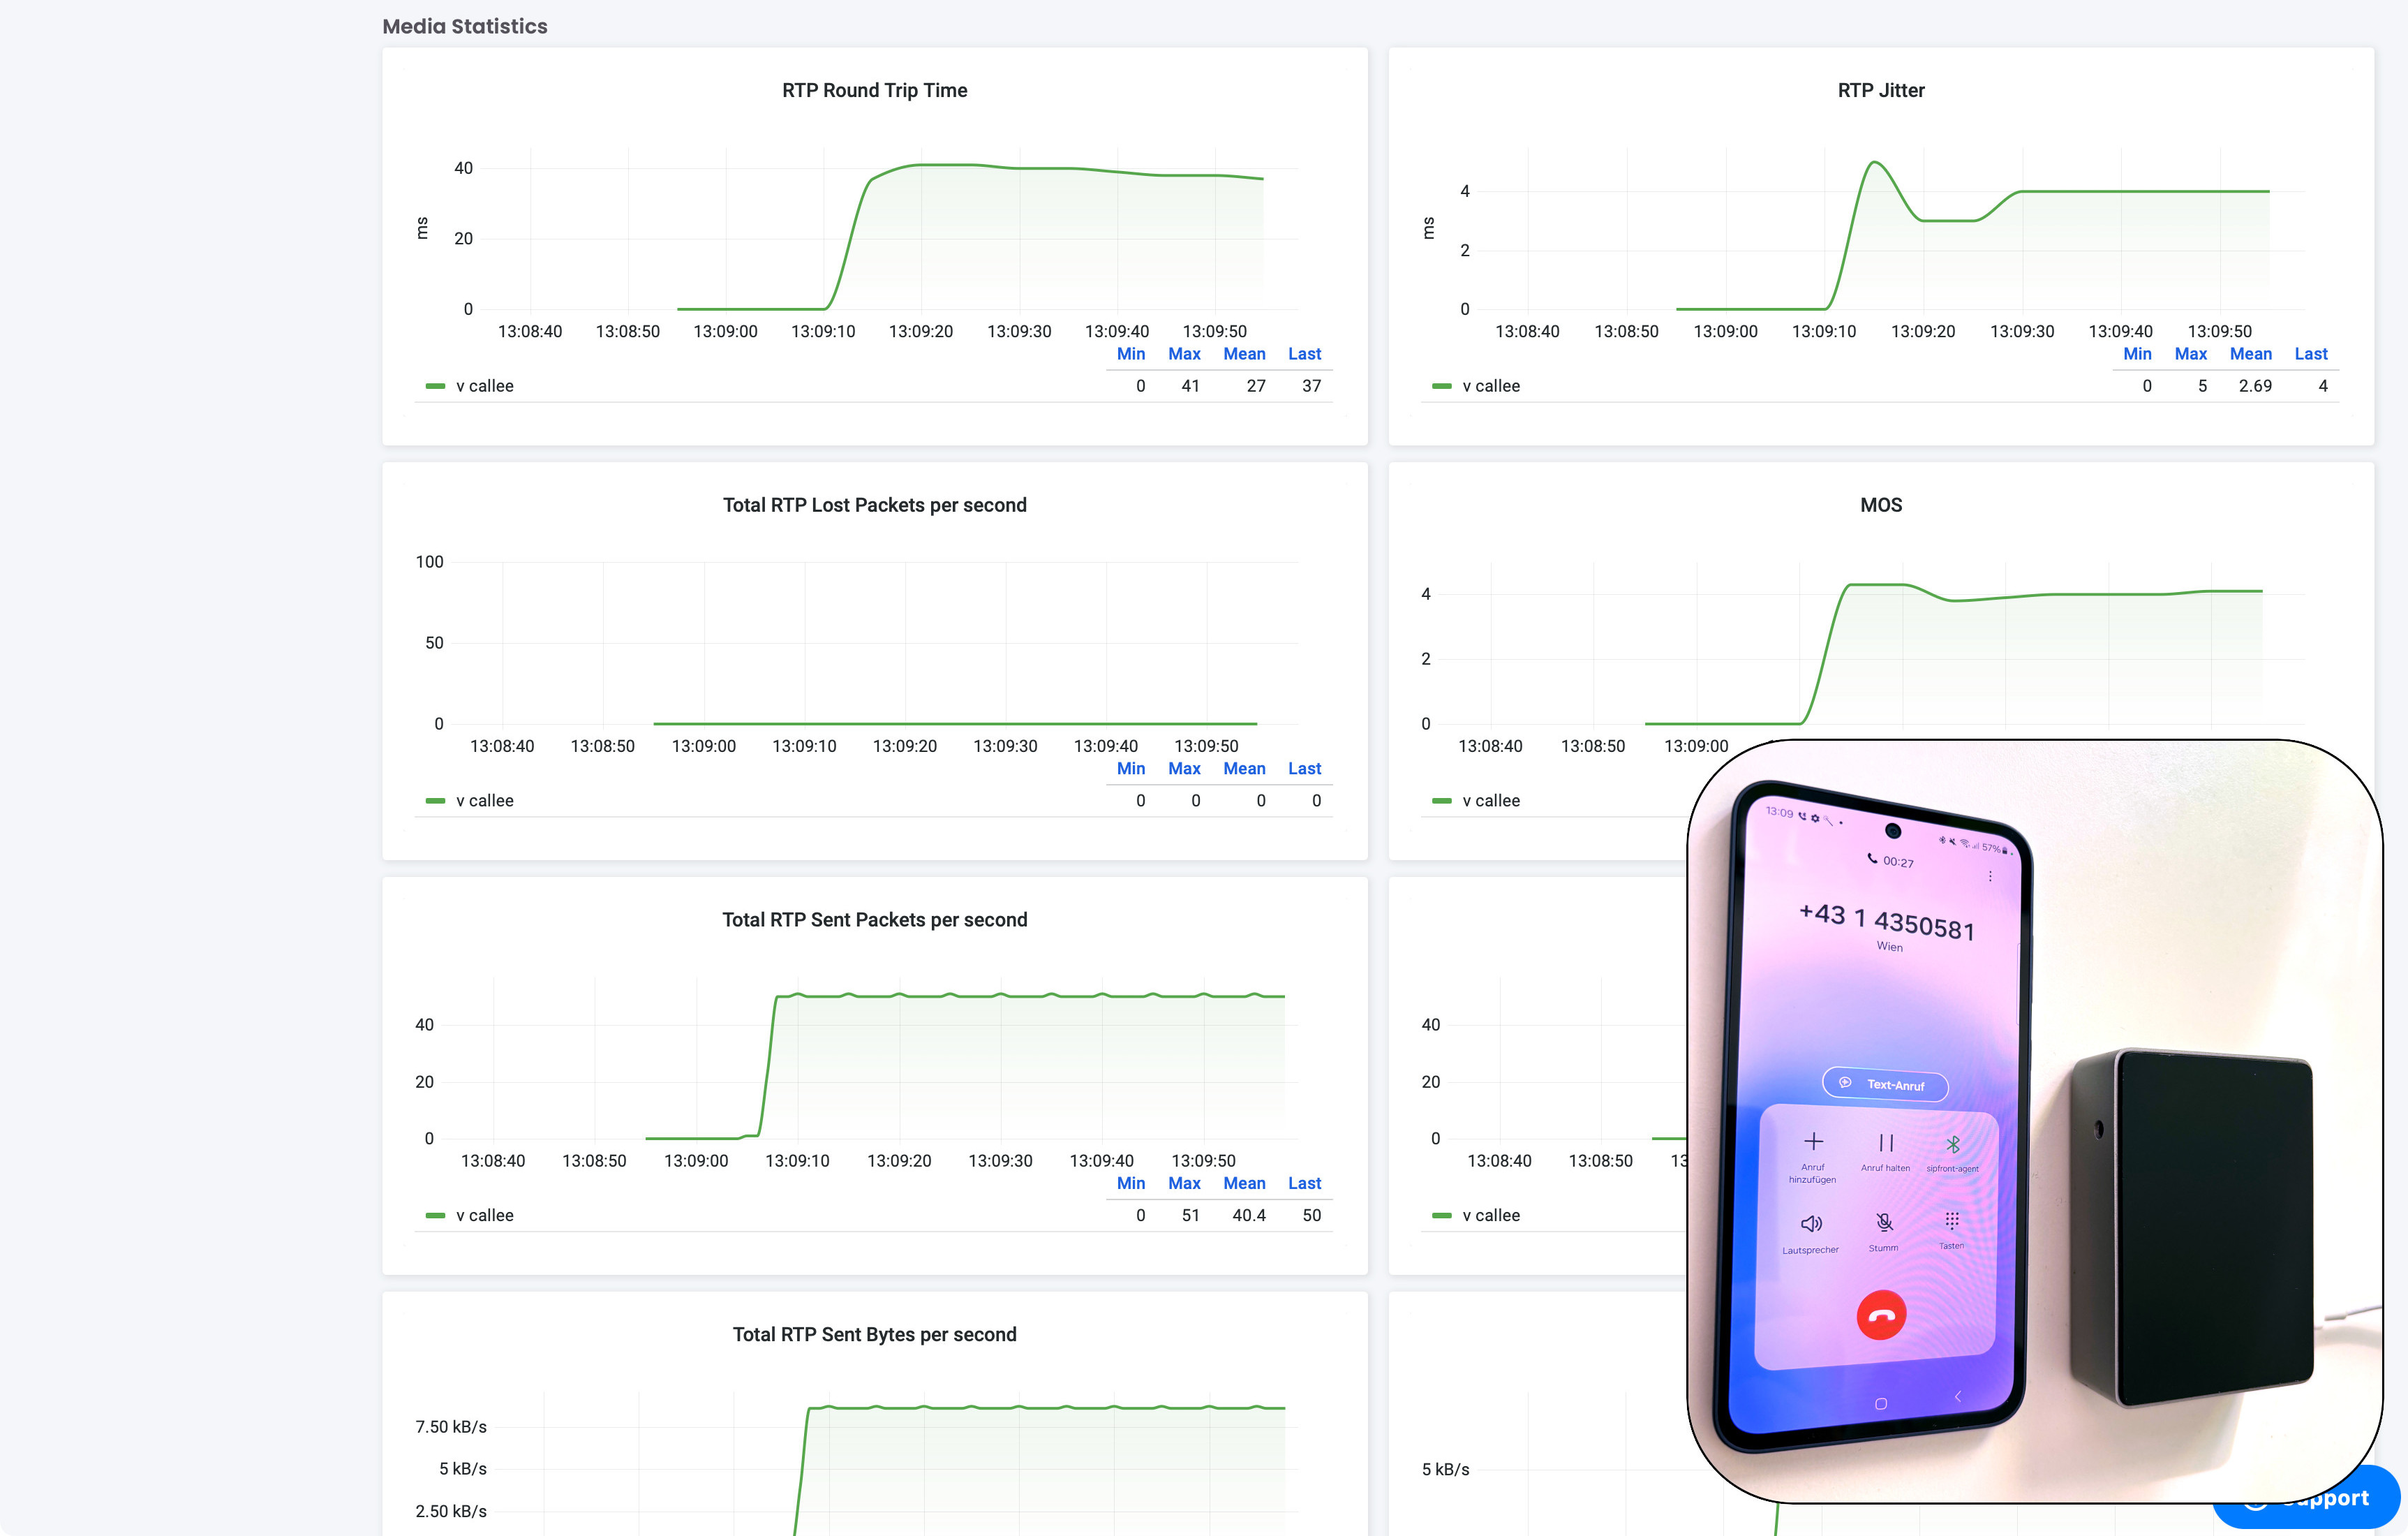
It’s important to verify the audio flow once the call is up. When running wpctl status, you will recognize two new audio nodes, a source and a sink, which are generated on the fly by oFono.
The best results for injecting audio into the call are achieved by interacting with the PipeWire node ids directly, instead of using tools such as PulseAudio. One reason is that when playing to and recording from the phone at the same time, regardless of the sources and sinks used, we always got both streams mixed into the recording. This can be worked around by tapping directly into the PipeWire bluetooth device node.
For pw-play and pw-record to address the dynamically created audio nodes, you need their corresponding node ids, which can be obtained using pw-cli ls and parsing the object.serial from it. Attempts to use pw-dump and parse the JSON do not work (at the time of writing in 03/2025) due to PipeWire producing broken JSON.
Why not just use scrcpy or Appium?
When using UI automation tools like scrcpy or Appium, you can indeed simulate button presses to dial a number or answer a call, but you won’t capture the audio data because the phone’s modem routes call audio of the native dialer directly to the speaker, Bluetooth device, or wired headphones. The phone OS does not pass this audio stream through the usual system mixers that scrcpy or Appium might tap into. So, if you need the real audio path for testing (e.g., speech recognition, IVR, or analyzing call quality), you must intercept the actual phone call audio — exactly what HFP is designed to do.
However, you can obviously use scrcpy or Appium to control the phone and interact with the UI for pairing the phone and recording the screen during calls, while using the HFP setup to handle the audio part. This way, you can have a complete end-to-end test setup for your mobile call.
Real signaling on real devices
While you can test mobile calls using SIM boxes such as Yeastar TG series, they don’t cover all the edge cases that a real phone might encounter. This is because every phone manufacturer has its own SIP signaling quirks in how they handle VoLTE, VoNR, or Wi-Fi Calling.
Emulated or lab-based solutions often miss these edge cases, leading to incomplete testing. By pairing a phone over Bluetooth, you get 1:1 real-world signaling via the mobile network using the exact same devices and OS versions your customers use.
Pros and cons of Bluetooth connections
While Bluetooth HFP is a great way to connect to a phone, it has its limitations. Here is a comparison of pros and cons you might encounter.
Pros
- Ease of Setup: Most phones support Bluetooth HFP out of the box. No special cables or drivers or companion apps on the phones are needed.
- Call Signaling Integration: You get full call events (call states, call waiting, etc.) directly from the phone’s telephony stack.
- Broad Compatibility: Works with iOS, Android, or any phone that supports HFP.
Cons
- Audio Quality Limitations: Over HFP, the default codec may be CVSD (8 kHz), or mSBC (16 kHz). Even if the phone uses wideband AMR or EVS on the cellular link, the audio that arrives at the Pi might be limited in bandwidth, potentially impacting the measured call quality.
- Latency: Bluetooth can introduce latency in both audio directions.
Alternatives
If you need higher-fidelity audio or prefer direct digital capture, you could try capturing audio via USB-C (if the phone supports USB Audio). This approach can provide better sample rates and possibly maintain wideband or full-band audio.
Automating the setup with Sipfront
While the above setup can be done manually to test phone calls, Sipfront automates these tasks. We provide ready-to-go Raspberry Pi images, which you can flash to your SD cards and get up and running in minutes by controlling them via the Sipfront dashboard.
Running a sipfront-agent container on the Raspberry Pi handles:
- Monitoring oFono events via D-Bus (e.g., call-incoming, call-active, call-ended).
- Executing commands such as place call to destination number.
- Orchestrating pw-play and pw-record to inject and capture audio.
- Managing the Bluetooth pairing or re-pairing process if needed.
Since this is part of the overall Sipfront test framework, you can automate calls from SIP accounts and WebRTC apps to your mobile phones and vice versa, allowing you to integrate them into your CI/CD pipelines and 24/7 platform monitoring.
Conclusion
Using a Raspberry Pi as a Bluetooth HFP endpoint is a straightforward yet powerful way to test real calls on actual mobile phones. By leveraging PipeWire, WirePlumber, oFono, and bluetoothd, you can automate call control, capture the call audio, and inject test audio. This ensures reliable end-to-end testing on real networks (4G, 5G, Wi-Fi), accounting for each phone’s peculiarities with VoLTE, VoNR, and beyond.
While this prototype can be set up manually, integrating it with Sipfront streamlines the process, allowing you to focus on testing your scenarios rather than maintaining custom scripts. If you need full control and realistic audio fidelity, consider exploring USB-C audio or other specialized capture methods. However, for most use cases, a Bluetooth HFP connection is a robust, portable, and cross-platform solution to automate testing with real mobile devices.
comments powered by Disqus