The rise of Voice AI has been nothing short of impressive. We’ve moved from clunky IVR systems to fluid, conversational agents powered by LLMs like OpenAI’s GPT-4o and Google’s Gemini Live within a year. While some popular platforms and open source projects like Jambonz, Asterisk and Freeswitch start to offer high-level abstractions to build these bots, sometimes you want to see how the sausage is made. You want to understand the raw mechanics of connecting a telephone call to an artificial brain.
In this post, I’ll walk you through our journey of building a Voice AI bot from scratch using baresip, an open-source, modular SIP client. We chose baresip not because it’s the most popular SIP client, but because it’s a lightweight, headless “skeleton” that we already use heavily for our Sipfront test automation. It runs perfectly in a Docker container and can be controlled via TCP, making it the ideal candidate for this experiment in Voice AI.
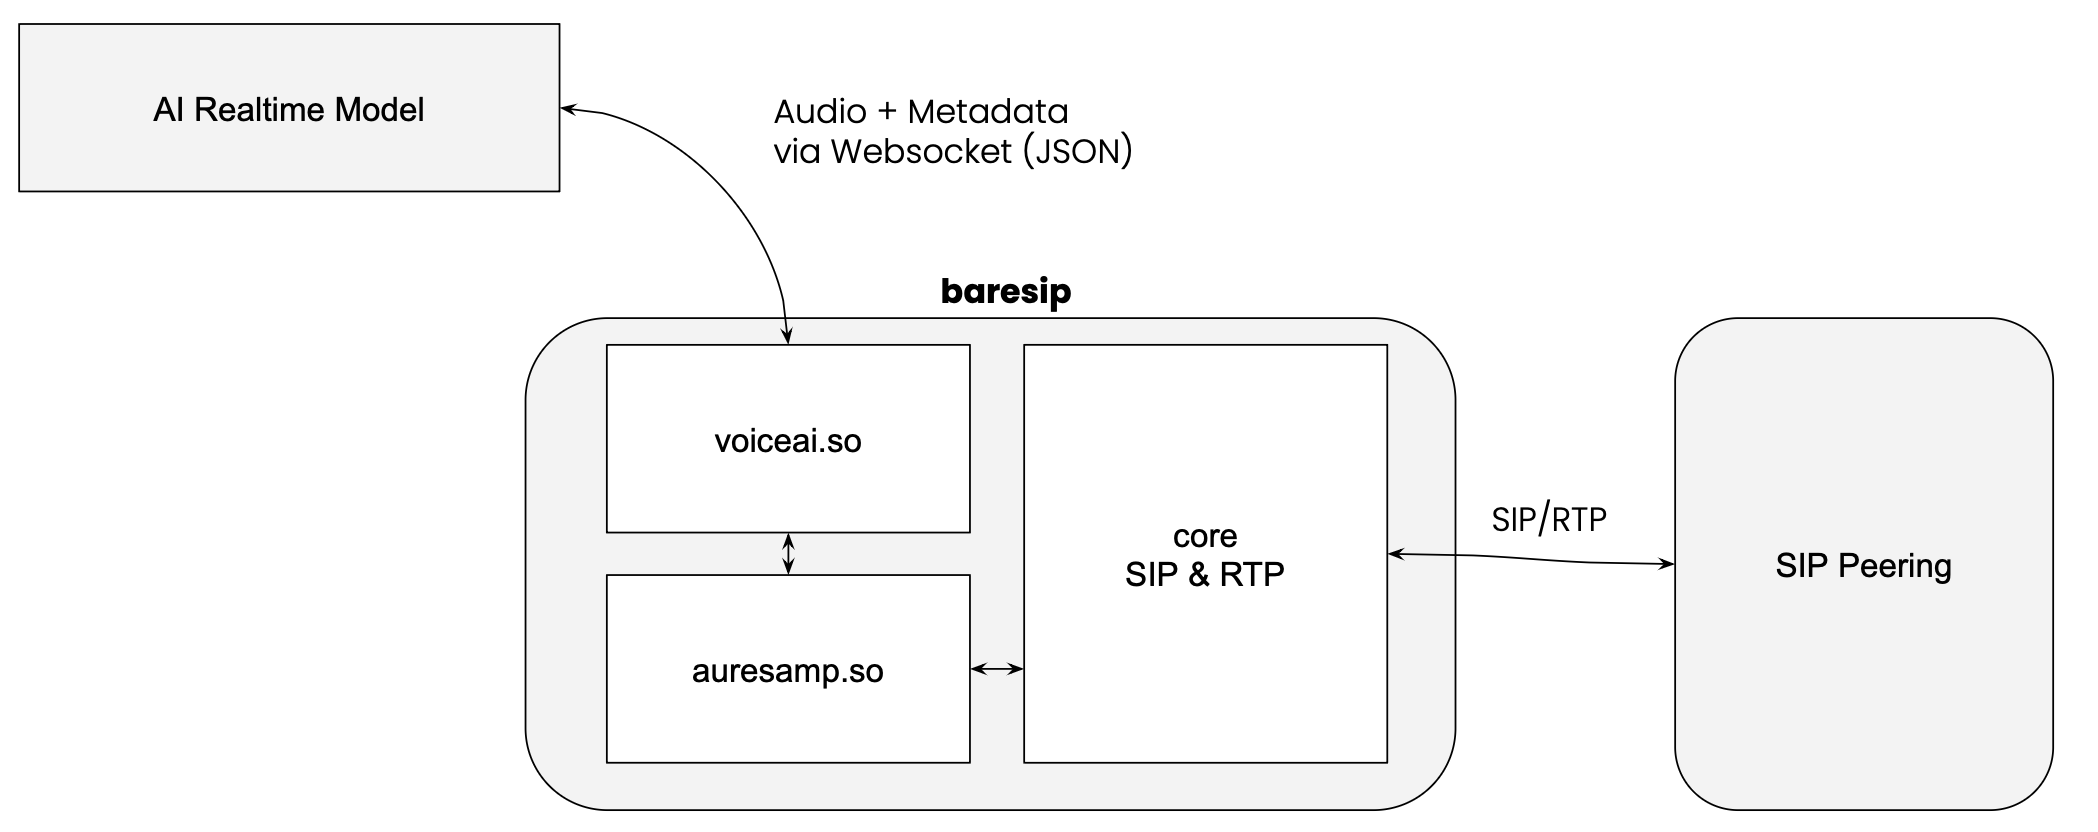
The Architecture: Why baresip?
Most people reach for Asterisk or FreeSWITCH when thinking about VoIP. They are powerful PBX and application servers. baresip, on the other hand, is a simple and performant SIP user-agent. It handles the SIP signaling and the RTP media stream, and that’s it.
For our Voice Bot, we needed a way to:
- Place or answer a SIP call.
- Extract the audio.
- Ship that audio to an AI model.
- Play the AI’s response back to the other party.
We implemented this by writing a custom C module for Baresip, supporting both OpenAI Realtime and Google Gemini Live.
Step 1: The Authentication (Ephemeral Tokens)
Before the C code even runs, we need an authentication token. Both OpenAI and Gemini require secure authentication, and you definitely don’t want to hardcode long-lived API keys into a C module or a configuration file running on a server.
Therefore, we operate our own internal API to fetch an ephemeral token for OpenAI and Google Gemini. This is a short-lived key that grants access to the Realtime API.
- For OpenAI: This step is crucial because it’s where we “lock in” the session parameters. We define the voice (e.g., “alloy”), the system instructions (“You are a helpful assistant…”), and the model version right here in the token generation request.
- For Gemini: We generate the token, but the session configuration happens later during the connection handshake.
The token is then configured in our baresip’s configuration file before the baresip instance starts.
This separation of concerns keeps the C module dumb and focused on transport, while our API handles the business logic configuration. In two deep-dive follow up posts, we will explore how to build these tokens for both OpenAI and Gemini.
Step 2: The Transport Pipe (WebSocket Connection)
Once baresip starts up and loads our module, it immediately establishes a WebSocket connection to the AI provider.
Why WebSockets? In the world of VoIP, WebRTC is the standard for browser-based audio because it uses UDP, which is way more suited for realtime communication. However, implementing a full WebRTC stack inside a custom application is a massive undertaking. WebSockets, running over TCP, are ubiquitous and easy to debug. It’s the choice for getting something running quickly, even if it comes with trade-offs (more on that later).
- For Gemini: Once the socket is open, we send a
setupmessage containing the system instructions and tool definitions. - For OpenAI: We send a
session.updateevent to attach any tools or modify parameters not locked in by the token.
Step 3: The “Virtual Cable” (Audio Transport)
This is the heart of the implementation. baresip normally takes audio from a microphone or a file and sends it off to the other end of the call, or plays audio from the other end to a speaker or records it to a file. We hijacked this process.
The Upstream: SIP to AI
We implemented a virtual audio source. When someone talks to our bot and speaks into their phone, baresip receives the voice as RTP packets (likely using G711, G722 or Opus). Our module sits at the end of the audio chain:
- Capture: We grab the raw PCM audio from the call.
- Downsample: The AI models expect specific formats (24kHz for OpenAI, 16kHz or 24kHz for Gemini). We use baresip’s
auresampmodule to convert the wideband RTP audio down (or the narrowband RTP audio up) to the required rate. - Encode: The PCM data is encoded into Base64 strings.
- Transport: We wrap this Base64 data in a JSON object (e.g.,
input_audio_buffer.append) and push it over the WebSocket towards the AI model.
The Downstream: AI to SIP
When the AI replies, it sends audio chunks back over the WebSocket.
- Receive: We listen for messages like
response.output_audio.delta. - Decode: We Base64-decode the payload back into raw PCM audio.
- Buffer: We write this audio into a circular injection buffer. This is critical. Network packets arrive in bursts; audio hardware needs a smooth, constant stream. The buffer smooths out the jitter.
- Playback: Our virtual audio player reads from this buffer and feeds it back into the SIP call, so you hear the AI speak.
The Brains: Tool Calling and Interruptions
A voice bot that just chats is boring. We want it to do things.
Tool Calling:
Imagine you ask the bot, “Hang up the call.” The LLM analyzes this text and, instead of generating speech, sends a function_call event with the name hangup_call.
Our C module parses this JSON. It sees the hangup_call command and triggers baresip’s internal C API to actually terminate the SIP session. The bot can also dial digits (DTMF), transfer calls or performing API requests using this same mechanism.
Interruption (Barge-in):
Another important part of a naturally behaving voice bot is “barge-in”, being able to interrupt the AI.
When you start talking while the AI is speaking, the server-side VAD (Voice Activity Detection) at OpenAI or Gemini detects your voice. It sends a speech_started event, or a serverContent message with an interrupted=true flag.
Upon receiving this, our module immediately clears the injection buffer. The AI voice stops instantly, creating a natural conversational flow.
The Weak Link: TCP vs. UDP
While this architecture works beautifully for prototypes, it exposes a fundamental flaw in using standard WebSockets for real-time audio: TCP Head-of-Line Blocking.
TCP guarantees that packets arrive in order. If one audio packet is dropped on the internet, TCP pauses everything to retransmit that one packet. In a live conversation, this manifests as lag or a sudden “speed-up” effect when the buffered audio catches up.
- The SIP Side: Uses UDP (RTP). It’s robust. If a packet is lost, it’s gone; modern codecs like Opus cover up the glitch using Forward Error Correction (FEC) and Packet Loss Concealment (PLC).
- The AI Side: Uses TCP (WebSocket). It forces correctness over timeliness.
By bridging these two, we bottle-neck the resilient RTP audio into a fragile TCP stream. This is why production-grade Voice AI is moving toward WebRTC connections to the model, which preserves the UDP transport all the way through.
Pros and Cons of the Websocket Approach
Pros:
- Simplicity: You can build this in a week. WebSockets are easy to understand and debug.
- Control: Using baresip allows deep manipulation of the SIP stack without the overhead of a full PBX.
- Learning: Building this from scratch teaches you the fundamentals of audio buffering, resampling, and event-driven architecture.
Cons:
- Audio Quality: The TCP transport is susceptible to network jitter, causing latency spikes.
- Downsampling: Converting wideband audio to 16/24kHz loses some fidelity.
- Complexity: Managing circular buffers and thread synchronization in C is error-prone (segfaults are your new best friend).
We learned that while LLMs provide the “brain”, but the “nervous system” - the audio transport and buffering - is where the battle for user experience is won or lost.
While we will eventually move to WebRTC to solve the TCP bottleneck, this WebSocket-based architecture remains a powerful, accessible way to start working with the future of voice.
Stay tuned for follow-up posts where we dive deeper into the specific API implementations for Gemini and OpenAI!
For more information about our voice bot testing capabilities or to schedule a demonstration, please contact our team. We’re excited to help you take your voice AI testing to the next level.
comments powered by Disqus